
Catch-and-shoot basketball is the fastest way to turn a pass into points, and it sits at the center of modern shooting development. In simple terms, a catch-and-shoot jumper happens when a player receives the ball already prepared to rise, align, and release without extra dribbles or wasted movement. Coaches value it because most game threes, especially at higher levels, come from ball movement, closeouts, relocations, and drive-and-kick actions rather than isolation pull-ups. When players ask me how to shoot faster without losing accuracy, the answer usually starts with footwork, readiness, and a repeatable release.
Setting your feet sounds basic, but it is really shorthand for organizing the entire kinetic chain. Your lower body creates balance, your hips and shoulders determine alignment, your hands prepare the ball path, and your eyes anchor the target. If one link is late, the shot slows down. If multiple links are late, the shot turns into a rushed heave. That is why catch-and-shoot training matters for every position. Guards need it coming off swing passes, wings need it in corners and slots, and bigs increasingly need it as trail shooters and short-roll spacers.
This page is the shooting hub within Basketball Skills, so it covers the essentials that connect every shooting article: stance, footwork, shot prep, release speed, common mistakes, game application, and practice design. It also answers the practical questions players search most often: where should your feet point, should you hop or one-two, how low should the dip be, how fast can you release, and how do you speed up without flattening the arc. Over years of skill work, film review, and on-court sessions, I have seen the same pattern repeatedly: players improve fastest when they stop treating the shot as an arm motion and start treating it as a timed sequence from feet to fingertips.
Shooting is measurable. You can chart make percentage, time to release, left-right drift, shot depth, and quality of foot prep before the ball arrives. Tools such as Noah Basketball, HomeCourt, and simple slow-motion phone video make these details visible, but the underlying principles remain constant. The best catch-and-shoot players arrive on balance, show their hands early, get the ball from catch pocket to release pocket on a short path, and finish in line. Whether you are a youth player learning corner spacing or an advanced wing trying to shave a tenth of a second off your trigger, the skill begins with how you load your feet and ends with how cleanly you send the ball off your index and middle fingers.
Why Catch-and-Shoot Footwork Drives Shooting Percentage
Footwork determines whether the rest of the shot is easy or compensatory. The goal is not perfectly square feet; the goal is organized alignment that lets your hips, shoulders, elbow, and wrist work in the same direction. Most good shooters use a slight turn, with shooting-side foot subtly ahead and toes angled a bit off center. That stance frees the shoulder and reduces tension through the forearm. A completely square stance can work, but many players become rigid and pull the ball across their body. On the other extreme, an over-turned stance makes the shot sweep sideways and hurts consistency on quick catches.
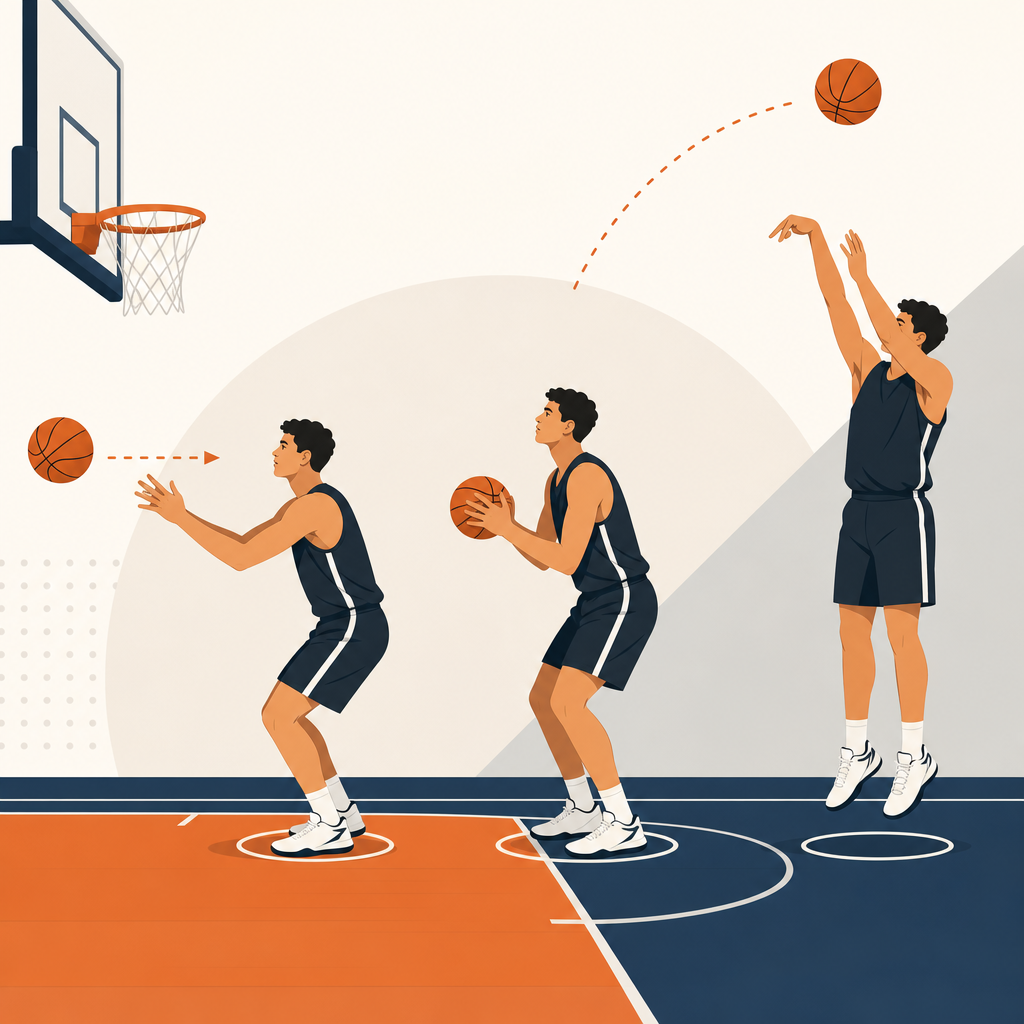
There are two primary catch-and-shoot footwork patterns: the hop and the one-two. The hop is simultaneous and compact. It works well for quick relocations, transitions, and situations where the pass is on time and on target. The one-two is sequential, often more natural for players moving into the ball or drifting from one spot to another. Neither is universally better. I teach players to own both because game situations demand both. If you are lifting from the corner to the wing, a one-two often matches movement. If you are ready in the corner waiting for a drive-and-kick, a quick hop may produce the fastest shot.
The key is landing before or as the ball reaches the hands, not after. Late feet create a chain reaction: the ball arrives, the player pauses, the defender closes, and the release gets rushed. Elite shooters solve this early. Watch Klay Thompson or Desmond Bane on film and you will see their lower body preparing before the pass is complete. Their hands are visible, hips loaded, and base set to move up through the ball. That early preparation is why the shot looks effortless. The speed is not only in the wrist; it is in how soon the feet are organized.
How to Set Your Feet on the Catch
To set your feet correctly, start with stance before the pass. Be on the balls of your feet, knees unlocked, hips loaded, and chest quiet. Show your target hands early so the passer can deliver to your shooting window. As the ball travels, bring your feet into your shot line. For many right-handed shooters, that means the right foot is slightly ahead, about two to four inches, with the body turned around ten to twenty degrees. The width should be athletic, roughly hip-width, wide enough for balance but not so wide that you cannot move vertically.
On the actual catch, think “land loaded.” Your heels may kiss the floor, but the weight should remain centered through the midfoot, ready to transfer upward. Avoid catching tall. Tall catches force a downward correction before lift. Also avoid stepping across your body, which twists the hips and pushes the elbow off line. If the pass is high, low, or slightly off center, adjust with small rhythm steps rather than large recovery moves. Great shooters are not perfect because passes are perfect. They are efficient because their corrections are small and fast.
Players often ask where the feet should point. The practical answer is this: point them where you can repeat your best line to the rim without strain. For some shooters that is nearly square; for others it is a modest turn. The test is simple. If your misses are consistently left or right and your shoulder feels tight, your stance may be fighting your natural motion. Film from the front and side, then compare makes and misses. You are looking for a setup that produces balance, a straight ball path, and a finish you can hold without drifting.
Release Faster Without Sacrificing Accuracy
Fast release does not mean hurried release. It means eliminating excess motion between catch and lift. The biggest time wasters are a deep dip, a wide ball sweep, and delayed hand preparation. Keep the shot pocket compact. As the ball arrives, your guide hand stabilizes and your shooting hand gets under and slightly behind the ball quickly. From there, move directly into the release path. Most players can gain immediate speed by reducing how low the ball drops after the catch. A small dip can provide rhythm and power, especially from three, but a long dip invites contests.
The upper body should stay quiet and connected. Bring the ball up through the shooting slot near the dominant eye or eyebrow area, depending on your form, with the elbow under the ball rather than flared. Then extend from the ground up in one timed motion. If the lower body jumps before the ball is ready, the release becomes disconnected. If the ball rises before the legs engage, the shot becomes all arms. The feeling to chase is seamless transfer: catch, gather, lift, snap. In training, I often use a metronome count or verbal cue like “feet-ball-up” to help players feel that sequence.
Release speed also depends on decision speed. Hesitation adds time even when mechanics are solid. Players who shoot well on air often slow down in games because they catch to decide instead of deciding before the catch. The best catch-and-shoot scorers read the floor early. They know the defender’s distance, the pass angle, and whether the shot is available before the ball touches their hands. That early read turns the catch into the trigger instead of the start of deliberation. Confidence matters here, but confidence grows from repetitions that match real game timing and pressure.
Core Shooting Mechanics Every Player Should Own
Good catch-and-shoot mechanics are simple to describe but demanding to repeat. Start with eyes on the rim early, preferably before the catch. Receive the ball into your shot pocket, not your stomach or shoulder. Keep the guide hand on the side of the ball, quiet through release. The shooting wrist should be loaded back, elbow under the ball as much as your anatomy allows, and shoulders level. As you extend, generate force from the floor, transfer through the hips and torso, and finish with a relaxed wrist snap and fingers down. The ball should leave with clean backspin and a consistent arc.
Arc and depth matter more than many players realize. Research and tracking data from systems such as Noah Basketball consistently show that shots with appropriate arc and enough depth increase make probability because they enter the rim with a larger effective target window. A flat shot can look strong but reduces margin for error. For many shooters, an arc in the mid-forties by degrees is a healthy benchmark, though exact numbers vary by release height and distance. If you are trying to speed up your release, do not solve it by flattening the shot. Keep your touch and trajectory intact.
| Element | What Efficient Shooters Do | Common Mistake | Fix |
|---|---|---|---|
| Stance | Slight turn, balanced base, midfoot pressure | Too square or over-turned | Adjust foot angle until shoulder relaxes and misses center |
| Catch | Hands ready, ball into shot pocket | Catching high, low, or across body without prep | Show target hands early and meet the pass |
| Dip | Short rhythm dip only if needed | Deep dip below waist | Start the ball higher and shorten gather |
| Release | Direct path, quick wrist snap, full extension | Wide sweep or delayed guide-hand removal | Use form reps and one-motion catch-to-shot drills |
| Landing | Balanced, slight forward drift acceptable | Fade, kick legs, or land sideways | Hold finish and chart balanced landings |
Game Situations: Corners, Wings, Movement, and Pressure
Catch-and-shoot basketball changes by spot and context. Corner threes are shorter and often arrive after drive-and-kick action, so the priority is readiness and a compact hop or inside-foot setup. Wing and slot threes may require more movement into the ball and more awareness of help defenders closing from the nail. Trail threes in transition reward players who can stop behind the line on balance without floating forward. Each spot asks for the same core mechanics but slightly different footwork timing. That is why shooting practice should include location-specific reps instead of only stationary shots from one place.
Movement shooting expands the skill beyond standing still. When you relocate after a drive, lift from the corner, or fade slightly to create a passing angle, your feet must absorb momentum before the release. The best cue is “move, stop, up.” Many players skip the stop and let horizontal momentum carry into the shot, causing left-right misses. Film makes this obvious. If your shoulders continue drifting after release, your base did not truly organize. Drills with a coach, chair, or cone can teach the deceleration pattern, but the principle stays the same: arrive on balance before you fire.
Pressure changes mechanics if you do not train for it. A hard closeout tempts players to rush the ball, drop it too low, or jump sideways. The antidote is practicing with live contests, time constraints, and decision rules. For example, use a drill where every catch requires either immediate shot, one-dribble escape, or swing pass based on the defender’s distance. That teaches shot selection with technique. Shooting is not just form. It is form under information. Players who train only uncontested reps may improve rhythm but often stall when defenders force earlier decisions and tighter windows.
Practice Plan, Mistakes to Fix, and How This Hub Connects Your Shooting Work
A useful shooting plan balances technique, volume, and transfer. Start with form shooting close to the rim to groove wrist action, ball path, and aligned finish. Move into stationary catch-and-shoot reps from five key spots, then add footwork variation with hop and one-two entries. After that, progress to relocation shots, transition stops, and closeout reads. Finish with pressure segments such as make streaks, timed rounds, or consequence-based games. In my experience, players improve faster when they chart not only makes but also release time, balanced landings, and whether the miss was short, long, left, or right. Data makes adjustments honest.
The most common mistakes are predictable. Players catch upright, dip too deep, let the guide hand influence the ball, or drift sideways because they never fully stop. Others chase speed by cutting off follow-through or forcing a line-drive trajectory. Fixes should be equally specific. If the shot is slow, shorten the dip and prepare hands earlier. If misses spray right for a right-handed shooter, check whether the guide hand is pushing or the stance is too open. If shots are short, examine lower-body timing before assuming the arms are weak. The body usually tells you the truth if you film enough reps.
As the shooting hub for Basketball Skills, this page sets the foundation for every related topic: form shooting, three-point range, movement shooting, shooting off the dribble, free throws, finishing your follow-through, and game-speed practice design. Master catch-and-shoot habits first because they teach the universal principles of balance, alignment, rhythm, and decision timing. Build your base, shorten the path from catch to release, and practice the shots you actually get in games. Then track your results over several weeks, not one workout. If you want to become a more reliable shooter, start with your feet today and make every catch look ready to score.
Frequently Asked Questions
What is a catch-and-shoot jumper, and why is it so important in modern basketball?
A catch-and-shoot jumper is a shot taken immediately after receiving a pass, with little to no extra dribble, reset, or hesitation. The goal is to be ready before the ball arrives, so the catch flows directly into your upward motion and release. That is what makes it different from other jump shots. Instead of creating space with the dribble, the shooter creates efficiency through timing, footwork, body preparation, and quick mechanics.
It matters so much because that is how a huge percentage of perimeter shots are created in real games. Most open threes do not come from standing still and slowly setting up. They come from drive-and-kick actions, swing passes, skip passes, transition pitch-aheads, relocations around penetration, and closeout situations where the defense is rotating late. In those moments, the player who can catch, get aligned instantly, and release before the defender recovers becomes extremely valuable.
Coaches prioritize catch-and-shoot skill because it fits winning basketball. It rewards spacing, off-ball movement, and decision-making. A player who can consistently convert catch-and-shoot opportunities forces defenders to stay attached, which opens driving lanes, post entries, cuts, and secondary passing windows for the entire team. In other words, catch-and-shoot ability is not just about individual scoring. It changes defensive behavior and improves the offense around it.
How should I set my feet on a catch-and-shoot so I can get into my shot faster?
The biggest key is to get your feet organized before or as the ball arrives, not after the catch. Great shooters do not catch first and then spend extra time searching for balance. They prepare their base early. That usually means stepping into the pass with controlled, efficient footwork so the lower body is ready to transfer energy upward immediately.
There are a few common ways to do this well. Some players prefer a one-two step, where one foot lands first and the second foot follows into shooting position. Others use a hop, where both feet land nearly together as they receive the pass. Neither is universally better. The best option is the one that helps you get square enough, balanced enough, and quick enough without adding unnecessary movement. In both cases, the feet should land under control, with the knees bent, hips loaded, and weight centered rather than drifting too far forward, backward, or sideways.
Your stance does not need to be perfectly square in a textbook sense. Many strong shooters use a slight turn in the feet and hips because it feels more natural and helps align the shooting side. What matters most is consistency. If your feet land in a position that lets your shoulders, hips, and shooting path stay repeatable, that is a workable foundation. The problem comes when the feet are too narrow, too wide, or still moving after the catch, because that forces the upper body to make extra compensations.
To improve this, practice arriving into your shot from different game-like situations: corner spacing, wing lifts, slot relocations, drift actions, and transition trail threes. Work on catching with your hands ready and your feet already preparing to land. The smoother your footwork becomes, the less time you waste between the catch and release.
What are the most common mistakes that slow down a catch-and-shoot release?
The most common mistake is being unprepared before the pass gets there. Many players stand too upright, keep their hands low, or wait until the ball is already in their chest before thinking about their shot. That delay may only be a fraction of a second, but in basketball, that is often the difference between an open look and a contested one.
Another major issue is extra movement after the catch. This can include dipping the ball too low, taking unnecessary adjustment steps, pausing to square the shoulders, or bringing the ball across the body before lifting it into the shooting pocket. Every one of those motions adds time and creates more chances for the shot to break down under pressure. A fast release is usually not about moving faster everywhere. It is about eliminating wasted motion.
Poor balance also slows shooters down. If your feet land off-line or your momentum is carrying you sideways, you have to spend extra time correcting yourself before releasing. The same is true if your base is inconsistent from rep to rep. Quick shooters tend to look calm because they are efficient. Their lower body supports the shot instead of forcing a last-second recovery.
Finally, some players mistake speed for rushing. They try to fire the ball before they are connected from the floor up, which leads to flat shots, drifting, or poor touch. The goal is not a hurried release. It is a clean, compact release. Quickness in catch-and-shoot basketball comes from readiness, alignment, and repetition, not panic.
How can I release the ball faster without hurting my shooting form or accuracy?
The best way to release faster without losing accuracy is to tighten your mechanics, not abandon them. A fast release should still be balanced, connected, and repeatable. Start by making sure your hands are ready before the catch. Your shooting hand and guide hand should be prepared to receive the ball cleanly, so the catch naturally flows into your shot pocket instead of requiring a reset.
Next, focus on shortening the path of the ball. If you bring the ball too low on the catch or loop it behind your head before release, you create extra time and more room for mechanical inconsistency. Efficient shooters move the ball directly from the catch into a compact shooting motion. That does not mean eliminating rhythm. It means removing unnecessary motion while keeping the shot smooth.
Footwork is also a major part of release speed. When the feet and hips are loaded on time, the upper body does not have to wait. This is why so many players feel “slow” even though their arm action is fine. The real issue is often that their base is late. Quick release starts from the ground up. If the lower body is set early, the ball can get out naturally and on balance.
Training should emphasize realistic repetitions. Practice quick catches from different pass angles, different spots on the floor, and different types of movement. Use drills with closeout pressure, relocate after passing, and alternate between one-two footwork and hop footwork if both are part of your game. Film yourself if possible. Often the fastest improvement comes from seeing exactly where the delay happens: low hands, late feet, deep dip, or a pause before lift-off. Once you identify the bottleneck, you can speed up the shot without sacrificing shot quality.
What drills help the most with catch-and-shoot footwork, balance, and game-speed shooting?
The best drills are the ones that connect mechanics to realistic game actions. A simple but effective starting point is stationary catch-and-shoot from multiple spots, focusing on hands ready, early foot preparation, and a smooth catch-to-release sequence. This builds consistency, but it should only be the beginning. Real improvement comes when you add movement and decision-making.
One excellent drill is the relocate series. Pass the ball, move to a new spot on the perimeter, receive the return pass, and shoot immediately. This teaches you to organize your feet while moving, which is exactly what happens after penetration, post kick-outs, or extra passes around the arc. Another strong option is the drift-and-lift series, where you move in response to a driver and catch on the move into a shot. These reps train spacing awareness and foot alignment under game-like timing.
Closeout drills are especially important because many catch-and-shoot chances happen against a recovering defender. Have a coach or teammate contest from different distances so you learn to get your feet down early and release on time without speeding up mentally. You can also use a shot clock constraint, such as forcing the shot up within a certain count after the catch, to build urgency while keeping your mechanics intact.
Finally, include drills that vary the type of pass: chest pass, hook pass, skip pass, low pass, and slightly off-target pass. In games, not every pass is perfect. Great catch-and-shoot players can still get organized quickly when the delivery is not ideal. That combination of clean footwork, balance through the catch, and a compact release is what turns practice shooting into game-ready shooting.