
Shooting is the skill that turns basketball from movement into points, and beginners improve fastest when they learn a repeatable process instead of chasing quick fixes. In simple terms, basketball shooting is the coordinated action of stance, grip, alignment, leg drive, arm path, release, and follow-through working together to send the ball on line with the right arc and touch. I have coached new players through thousands of form reps, and the same pattern keeps showing up: players miss not because they lack strength or talent, but because one or two small positions break the chain. A clear step-by-step shooting form guide gives beginners a way to diagnose those positions, build consistency, and practice with purpose.
Good shooting matters because it affects every part of the game. A player who can make open shots forces defenders to close out, which opens driving lanes, cuts, and passing windows. Even at youth and recreational levels, reliable shooting improves spacing and decision-making. It also builds confidence, but confidence in shooting should come from mechanics and repetition, not hope. When coaches talk about “form,” they usually mean the foundational positions that make the shot efficient: balanced feet, a stable base, shooting hand under the ball, guide hand to the side, eyes on target, smooth upward motion, full extension, relaxed wrist snap, and a held follow-through. These basics apply whether you are learning a set shot, a catch-and-shoot jumper, or eventually a pull-up.
Beginners also need realistic expectations. Proper shooting form does not mean every player looks identical. Taller players may release a bit higher. Younger players may start from shorter distances while they build strength. Some shooters prefer a slight turn of the feet and hips to reduce shoulder tension. Those individual differences are normal. The non-negotiables are simpler: the ball should travel in a straight path, your body should stay balanced, and the release should be repeatable under light pressure and fatigue. If your form changes dramatically when you move back a few feet, the shot is not yet strong enough or stable enough.
This guide covers shooting as a complete beginner hub, from the setup to common mistakes, drills, and practice structure. If you are searching for how to shoot a basketball correctly, how to improve basketball shooting form, or what proper shooting mechanics look like, start here. Learn the sequence first, then add volume. Most missed shots can be traced to balance, alignment, timing, or touch. Fix those, and percentages rise quickly.
Build the base: stance, balance, and hand placement
Every good shot starts before the ball moves. Your stance should be athletic and relaxed, with feet about shoulder-width apart and knees slightly bent. Most right-handed shooters do well with the right foot very slightly ahead of the left; left-handed shooters usually mirror that position. That tiny stagger helps align the shooting hip, shoulder, elbow, wrist, and ball with the rim. I usually cue beginners to feel pressure on the balls of the feet, not the heels, because leaning back kills power and arc. Your chest stays tall, and your head stays still enough that your eyes can lock onto the target.
Hand placement is the next priority. The shooting hand goes under and slightly behind the ball so it can provide support and upward force. The guide hand rests on the side of the ball, not behind it, because its job is stabilization, not propulsion. Spread the fingers comfortably and keep a small pocket of air between the palm and ball when possible. That fingertip control matters. When the ball sits deep in the palm, beginners often push from two hands and create side spin. A clean shot usually rolls off the index and middle fingers or slightly more off the middle finger, depending on comfort and alignment.
The ball should start in a “shot pocket,” the ready position between the waist and chest for many beginners, then rise smoothly into the set point near the face or forehead. Do not dip the ball too low or swing it around the body; extra motion creates timing problems. Keep the elbow under the ball as it lifts. The old phrase “elbow in” can be misleading, because forcing the elbow tightly against the ribs creates tension. A better cue is “elbow under the ball and forearm vertical.” If the forearm is angled outward, the ball often leaves the hand off line.
Target selection matters too. Pick a precise aim point, such as the back of the rim or the center of the hoop, and use it consistently. Beginners who look generally at the basket often have inconsistent depth. A fixed target sharpens focus and makes misses more informative. Short misses usually signal low arc, poor leg drive, or deceleration. Long misses often come from too much power or a flat release with excess forward push.
The shooting motion: legs, lift, release, and follow-through
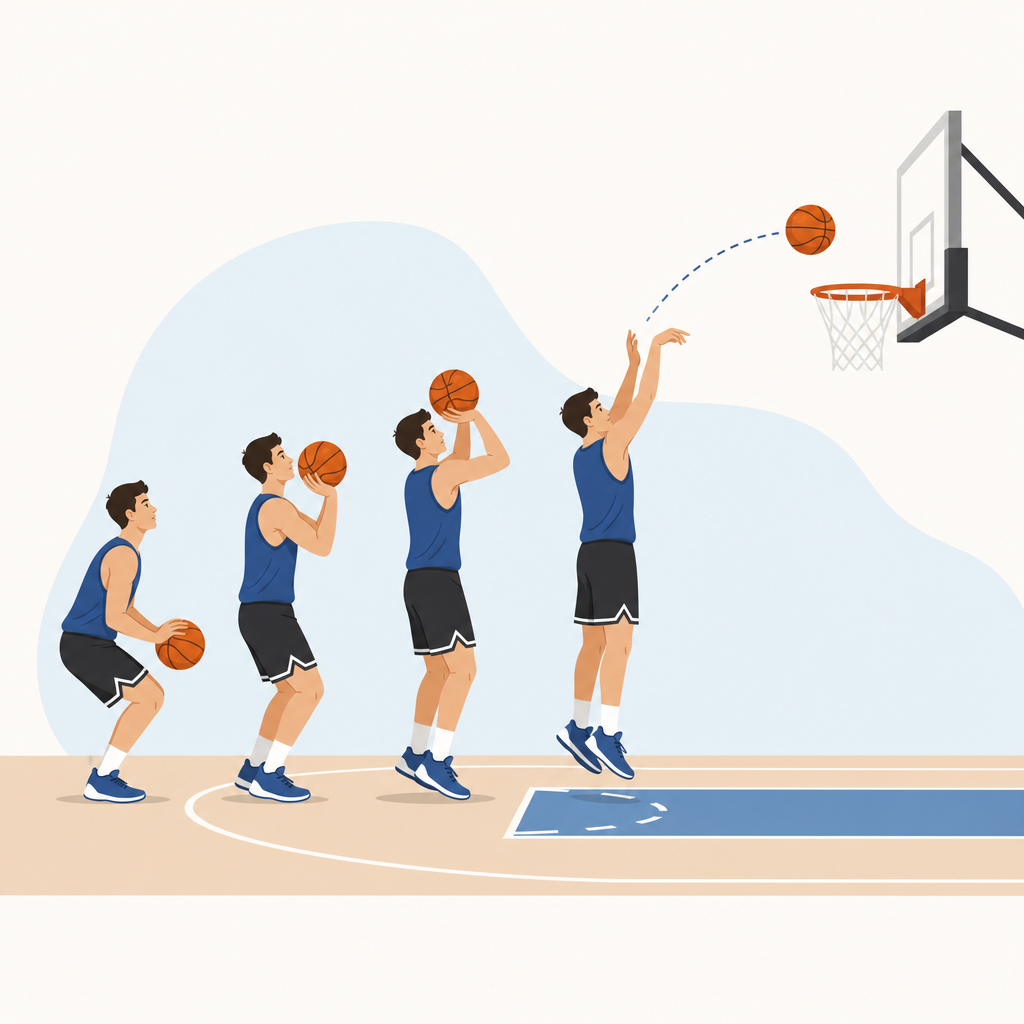
Once your base is set, the shooting motion should feel like one continuous chain from the floor through the fingertips. Start with a small, controlled dip of the knees and hips. This is not a deep squat. It is a loaded position that lets the legs provide force upward. The most common beginner error is separating the lower body from the upper body: the legs straighten first, then the arms push late, producing a heave. Efficient shooters time these actions together so the ball rises as the body rises.
As you begin the lift, bring the ball from the shot pocket to the set point in a straight path. Keep the guide hand quiet. Your shoulders stay level, and your core stays firm enough to prevent swaying. At release, the elbow extends, the wrist snaps forward, and the fingers finish pointed at the rim. Coaches call this “gooseneck” follow-through, but the real goal is a relaxed wrist and complete extension, not a pose for its own sake. Hold the follow-through briefly because it reveals what happened. If your fingers finish left or right of the target, your release path was likely off line.
Arc is critical. A shot with too little arc has a smaller margin for error because it approaches the rim at a flatter angle. Research and player tracking have consistently shown that make percentage improves when the ball enters on a steeper, controlled descent. For most beginners, thinking “up before out” helps. You want enough lift to clear the front rim comfortably without turning the shot into a rainbow that is hard to control. On free throws and short jumpers, a release angle around the mid-40-degree range is often taught as a practical benchmark, though exact numbers vary by player.
Do not chase power with your arms. Range should come from coordinated leg drive, smooth timing, and efficient sequencing. If the ball spins sideways, your guide hand is interfering. If the shot is flat and hard, you are pushing instead of releasing. If your body drifts forward or sideways, your balance is unstable. The best beginner cue is simple: balanced base, straight rise, soft release, held finish.
Step-by-step form guide beginners can follow every session
A reliable beginner routine reduces overthinking. Use the same sequence on close-range shots, then carry it outward as your strength and control improve. Start two to six feet from the basket, slightly off center so you can see your alignment clearly. Make the mechanics clean first, then add distance, speed, and game context later. Here is the progression I use most often with new shooters.
| Step | What to do | What to check | Common beginner mistake |
|---|---|---|---|
| 1. Set stance | Feet shoulder-width, slight stagger, knees soft, eyes on rim | Weight centered on balls of feet | Standing upright or leaning back |
| 2. Place hands | Shooting hand under ball, guide hand on side | Ball controlled by fingertips | Guide hand behind ball |
| 3. Load the shot | Small dip into shot pocket | Ball stays close to body | Dropping ball too low |
| 4. Lift in line | Rise smoothly from legs while ball moves up straight | Forearm vertical under ball | Elbow flaring out |
| 5. Release | Extend elbow and snap wrist at top of rise | Backspin, not side spin | Pushing with both hands |
| 6. Hold finish | Arm extended, wrist relaxed, fingers to rim | Body lands balanced | Dropping hand early |
| 7. Track result | Notice miss direction and depth | Identify one correction only | Changing everything at once |
Repeat this sequence for short, one-hand form shots first. Those reps teach touch and alignment better than long jumpers. If you cannot make soft shots near the rim with clean mechanics, stepping back usually adds bad habits. A strong benchmark for beginners is making 8 out of 10 close form shots from multiple spots before moving farther away. This approach may feel slow, but it is the fastest path to lasting improvement.
Common shooting mistakes and how to fix them
Most beginner shooting problems are easy to recognize once you connect ball flight to body position. If your shot misses left or right repeatedly, first inspect alignment. Your feet, hips, shoulder, elbow, and release may not be working on the same line. A slight stance turn often helps. For a right-handed shooter, turning both feet a little left can make it easier for the right shoulder and elbow to stack naturally. If the misses still spray, look at the guide hand. Thumb flick from the non-shooting hand is one of the most common causes of side spin.
If you miss short, do not automatically assume you need more arm strength. Short misses often come from poor leg timing, a low release, or slowing down at the top of the shot. Finish the motion completely. Reach high, snap the wrist, and let the ball come off the fingers cleanly. If you miss long, especially on line, reduce the push from the shoulder and focus on touch. Soft shots have a better chance to bounce in. Hard shots reduce your margin for error.
Another issue is drifting. Beginners sometimes jump forward dramatically on every shot because they are trying to create range. A small natural forward movement can happen, especially on game-speed shots, but large drift changes the release point and harms consistency. Start by shooting closer. Build strength where form stays intact. When I see a player twist in the air, I usually lower the intensity and return to stationary reps until balance returns.
Finally, beware of copying advanced shooters without context. Elite players can shoot off movement, from deep range, and with individualized rhythms because they already own the fundamentals. Beginners should not practice difficult step-backs before mastering set shots, free throws, and basic catch-and-shoot mechanics.
Drills and practice structure that improve shooting faster
The best basketball shooting drills for beginners are simple, measurable, and focused on one skill at a time. Start with one-hand form shooting from very close range. Use your shooting hand only while the guide hand rests behind your back or lightly supports after the release. This drill teaches straight extension and clean backspin. Next, do wall shooting or seated wrist snaps to feel fingertip control. Then move to spot shooting from short corners, wings, and the middle, making a set number from each location before stepping back.
A practical 30-minute session might look like this: five minutes of form shots, ten minutes of short spot shooting, five minutes of free throws, five minutes of catch-and-shoot reps, and five minutes reviewing misses and cues. Record makes, not just attempts. Data matters. If you shoot 60 corner jumpers, note percentages by spot and distance. Over time, patterns tell you what to train. Tools like HomeCourt, Noah Basketball, and simple phone video can help track arc, depth, and mechanics, but beginners still improve well with a notebook and honest charting.
Video is especially valuable because shooting often feels different from how it looks. Film from the front, side, and behind. Check whether the ball path stays straight, whether the elbow gets under the ball, and whether the release is timed with the rise of the legs. Slow motion makes guide-hand interference obvious. I also recommend pressure-free repetition before contested reps. Build technique first, then add a defender, a closeout, or a time limit.
Free throws deserve special attention because they isolate mechanics and routine. Use the same breath, dribbles, target, and tempo every time. A stable free-throw routine trains concentration and exposes breakdowns in alignment and follow-through. Many coaches use the “swish 20” standard in close practice because a swish confirms line, arc, and touch better than a make off the backboard or rim.
How beginners should progress from form shooting to game shooting
Progression matters because the shot you use in a game must survive speed, fatigue, and defensive pressure. Begin with stationary form shooting close to the rim. Then extend to short set shots where you still land balanced and create soft backspin. After that, add catch-and-shoot footwork: one-two steps or a hop into the shot. The purpose is to arrive balanced before the ball reaches the shooting pocket. If your feet are still adjusting after the catch, the release will be late or rushed.
Next, add movement into the catch from the wing, corner, and top of the key. Learn to square your base without over-rotating your upper body. Then practice simple pull-ups off one or two dribbles, first going strong-hand direction and then weak-hand direction. Game shooting also includes decision-making. If the defender is tight, a shot may not be the right choice. Good shooters know when to shoot, drive, or swing the ball.
Range should be earned. I tell beginners not to live at the three-point line until they can maintain mechanics from mid-range. Youth players especially benefit from using a smaller ball or shorter rim when available under development guidelines, because correct sequencing matters more than forcing adult distance too early. The goal is not to look powerful. The goal is to make shots with efficient mechanics that will hold up as your body gets stronger.
To keep improving, link this shooting hub to focused work on free throws, catch-and-shoot footwork, off-dribble jumpers, finishing, and ball handling. Shooting gets better when the surrounding skills improve too. Start with the basics in this guide, practice them consistently, and evaluate your shot with clear standards. A repeatable shooting form makes every future basketball skill easier to use. Get to the gym, begin close, and build one clean rep at a time.
Frequently Asked Questions
What are the most important steps in proper basketball shooting form for beginners?
For beginners, the most important thing is learning a repeatable sequence instead of thinking about ten different body parts at once. A solid shot starts from the ground up. Begin with a balanced stance, with your feet about shoulder-width apart and your knees slightly bent. Your shooting-side foot can be just a little ahead of the other to help line your body up naturally with the basket. From there, hold the ball with your shooting hand under or slightly behind the ball and your guide hand on the side. The guide hand should help balance the ball, not push it.
Next comes alignment. Try to stack the ball, wrist, elbow, and shoulder on the same shooting line toward the rim. As you start the shot, dip into your legs and then rise smoothly upward. Your power should come from your legs first, then flow through your core, shoulder, arm, wrist, and fingertips. This is what gives a shot rhythm instead of making it look forced. At release, extend your arm fully, snap your wrist, and finish with relaxed fingers pointed down, often called the follow-through. Hold that finish briefly so you can check whether your mechanics stayed on line.
For most beginners, the real breakthrough comes when these steps stop feeling separate and start working as one motion. Good shooters do not just throw the ball with their arms. They use balance, timing, and body alignment to make the shot efficient. If you can consistently build your shot around stance, grip, alignment, leg drive, release, and follow-through, you will improve much faster than someone who only focuses on whether the ball went in on one attempt.
Why do beginners miss shots so often even when they think their form looks correct?
Beginners usually miss not because they are completely off, but because one or two small parts of the motion break down under repetition. A shot can look decent from a distance and still have hidden flaws. Common issues include poor balance, an elbow that flares out, a guide hand that adds sideways force, releasing the ball too late or too early, or shooting with flat arc. These errors may seem minor, but basketball is a precision skill. Small changes in angle, timing, and hand position can send the ball off line.
Another major reason is inconsistency. Many new players do not shoot the same way every time. On one rep they use their legs correctly, on the next they rely mostly on the upper body. Sometimes the ball starts in the middle of the body, sometimes too far to the side. Sometimes they hold their follow-through, sometimes they drop it immediately. Because the motion changes from rep to rep, the result also changes. This is why improvement comes from repeatable mechanics, not from randomly taking more shots.
There is also a difference between making a shot and shooting it well. A beginner can make a basket with poor form, especially from short range, and assume everything is correct. But weak habits usually show up as distance increases or pressure rises. The best way to fix this is to judge each shot by process first: Was your base balanced? Did the ball stay on line? Did your wrist snap cleanly? Did your guide hand stay quiet? If you train those checkpoints consistently, the makes will follow more reliably over time.
How can I tell if I am using too much arm and not enough legs in my shot?
A simple sign is that your shot looks forced, especially as you move farther from the basket. If you are using too much arm, the ball may come out flat, your shoulders may tense up, and your release may look like a push instead of a smooth upward flow. You might also notice that your shot changes dramatically depending on distance. Close shots may feel manageable, but once you step back, your elbow flares, your guide hand starts helping, or you heave the ball from your chest. Those are classic signs that your lower body is not providing enough power.
Proper shooting power starts with a controlled dip and rise. Your knees bend slightly, your hips stay balanced, and then you drive upward in rhythm with the ball moving into the shooting pocket and up through the release. The legs do not make the shot look jumpy or rushed; they provide the foundation that lets the upper body stay smooth. When the legs are involved correctly, the ball tends to come out with better arc and less visible strain. The motion feels connected instead of segmented.
One of the best ways to check this is to practice close to the basket with one-hand form shooting. Stand a few feet from the rim and shoot with your shooting hand only, focusing on balance, upward lift, and soft wrist snap. Then gradually add the guide hand back without letting it take over. If your shot becomes cleaner and easier when you stay close and use rhythm, that usually means your full shot has been relying too much on arm strength. The goal is not to eliminate arm action, but to make sure it works with the legs rather than replacing them.
What is the correct role of the guide hand when shooting a basketball?
The guide hand is there to support and stabilize the ball before release, not to generate power or change direction. For a right-handed shooter, the left hand rests on the side of the ball. For a left-handed shooter, the right hand does the same. Its job is to help keep the ball balanced as you bring it from the set position into the upward shooting motion. Once the ball reaches the release point, the guide hand should come off cleanly and quietly. It should not flick, push, or spin the ball sideways.
When the guide hand interferes, it often causes misses to the left or right. Many beginners do not realize they are doing this because the motion happens quickly. The shot may feel normal, but the off-hand is secretly adding force. Signs of guide-hand interference include side spin, a ball flight that drifts off line, or a release that looks uneven. If the shooting hand is doing its job, the ball should come off the fingertips with mostly clean backspin and a straight path toward the target.
To improve this, use simple shooting drills that isolate the release. One helpful method is to shoot short-range shots while paying close attention to whether the guide hand stays open and passive. Another is to exaggerate the finish of the shooting hand so you can clearly feel that the ball comes off the shooting fingers, not both hands together. Over time, a quiet guide hand helps create a more accurate and dependable shot because it removes unnecessary side force from the motion.
How should beginners practice their shot to improve faster and build consistency?
Beginners improve fastest when they practice quality repetitions with clear focus, not when they rush through large numbers of random shots. Start close to the basket so you can concentrate on mechanics without needing extra power. Form shooting is one of the best places to begin. Take shots from a short distance and pay attention to your stance, ball placement, elbow alignment, release, and follow-through. The goal at this stage is to build a clean motion that can be repeated over and over with control.
As your form becomes more reliable, gradually add distance while keeping the same mechanics. If your shot breaks down as you move back, you are too far out for productive form work. It is much better to make fifty disciplined shots from close range than fifty rushed shots from a distance where your technique falls apart. You can also structure practice in layers: first stationary form shots, then catch-and-shoot reps, then movement into the shot, and eventually game-speed situations. This progression helps you keep your technique intact as the difficulty increases.
It also helps to track a few simple checkpoints during practice. Ask yourself whether you stayed balanced, whether your guide hand stayed quiet, whether the ball had a good arc, and whether you held your follow-through. Video can be especially useful because it shows patterns you may not feel in the moment. Most importantly, be patient. Shooting skill develops through thousands of correct reps. If you commit to a repeatable process and practice with intention, consistency will grow naturally, and your confidence will rise along with it.